
Introduction to Danish Butter Cookies
What are Danish butter cookies and why are they special?
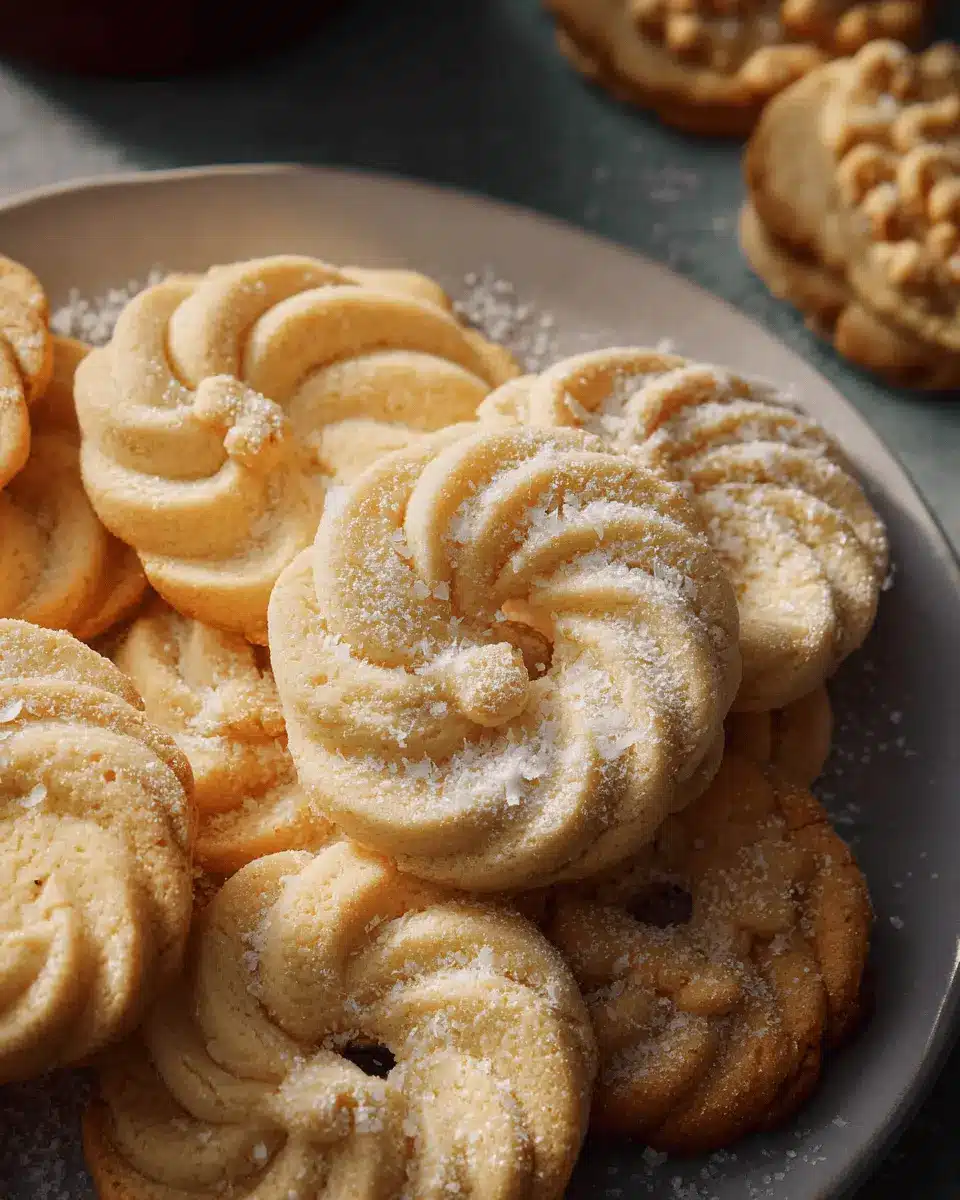
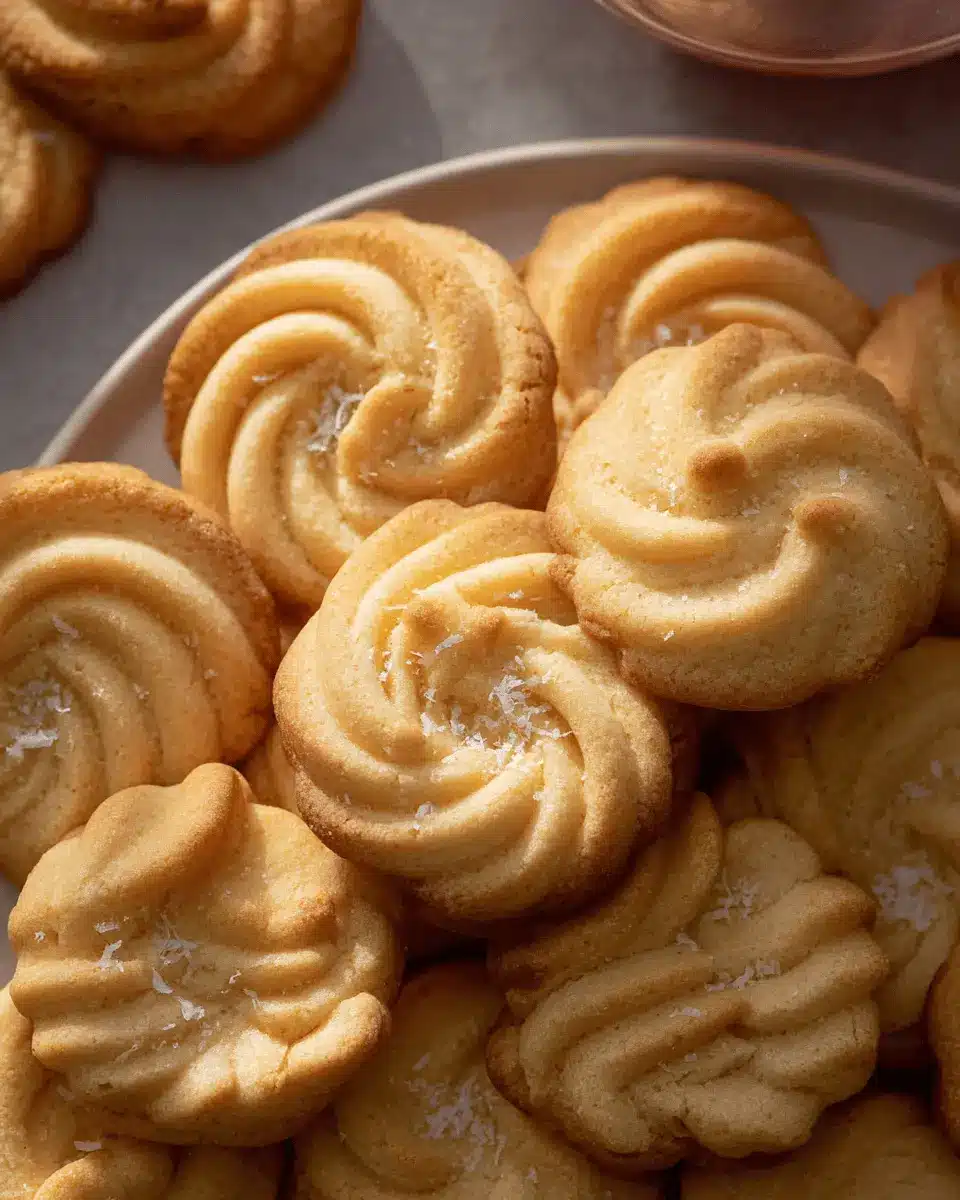
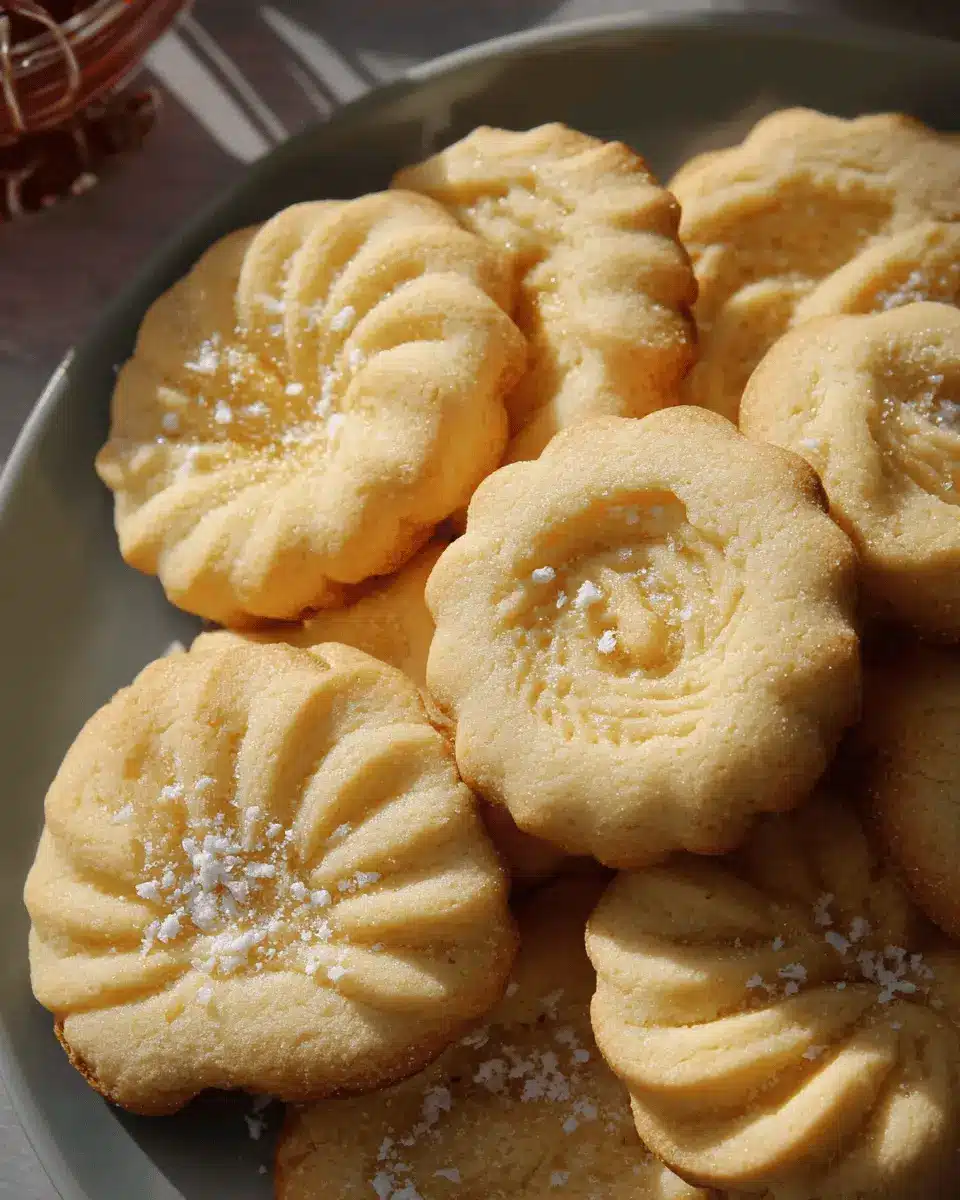
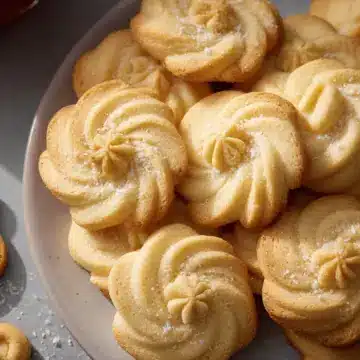
Danish butter cookies are delightful, buttery treats that have captured the hearts of cookie lovers around the world. Originating from Denmark, these cookies are known for their rich flavor and melt-in-your-mouth texture. What makes Danish butter cookies truly special are the high-quality ingredients used—most notably, European butter—which contributes to their luxurious taste. The buttery goodness is perfectly balanced with a touch of sweetness, creating a delightful flavor profile that appeals to both young and old alike.
These cookies often evoke warm memories of family gatherings and holiday celebrations. Whether you're munching on them with a cup of coffee or gifting them to friends, Danish butter cookies bring a sense of nostalgia. You'll likely find them in beautifully adorned tins, making them all the more memorable.
The ease of preparation adds to their charm, allowing home bakers to create these sweet treats with just a few pantry staples. For a delightful twist, consider exploring various shapes and decorations. As you embark on your baking journey with Danish butter cookies, you'll find not only a recipe but also a delightful experience that will fill your kitchen with love and warmth.
For more insights about these charming cookies, check out Food52’s Guide on their history and variations!
Ingredients for Danish Butter Cookies
Essential ingredients for the ultimate butter cookies
To whip up a batch of melt-in-your-mouth Danish butter cookies, you'll need just a handful of quality ingredients:
- Butter: 1 cup of European salted butter at room temperature creates the rich, creamy base.
- Sugar: Half a cup of granulated sugar adds sweetness and helps achieve the perfect texture.
- Egg Yolks: Two egg yolks contribute richness and a lovely golden hue.
- Flours: A mix of 2 cups of all-purpose flour and ½ cup of cake flour gives a delicate bite.
- Vanilla Extract: Two teaspoons for that classic flavor that elevates every bite.
- Milk: A tablespoon of milk (or more as needed) can help soften the dough.
- Coarse Sugar: Sprinkled on top for an attractive finish.
Why using high-quality butter matters
When it comes to Danish butter cookies, not all butters are created equal. High-quality butter, particularly European varieties, has a higher fat content and a richer flavor than standard brands. This difference not only enhances the overall taste but also provides the cookies with the glorious melt-in-your-mouth texture you're aiming for. Investing in good butter truly pays off, offering an exquisite end product perfect for gifting or indulging yourself. So, why skimp? Treat yourself to the best!
For more about the importance of high-quality ingredients, check out Serious Eats.
Step-by-Step Preparation of Danish Butter Cookies
Making Danish butter cookies is not just about throwing ingredients together; it's about enjoying the process and creating something delightful to share. Let’s go through each step together to ensure your cookies turn out perfectly every time!
Gather your tools and prepare the workspace
Start by organizing your kitchen. Find a large mixing bowl, measuring cups, a whisk, a stand mixer (if you have one), and a piping bag with a star tip. You’ll also need two baking sheets, parchment paper, or silicone baking mats. Don't forget to create space in your refrigerator to chill the cookies after piping; this simple step helps prevent spread during baking.
Cream the butter and sugar
The next step is vital for achieving that light, melt-in-your-mouth texture. In the bowl of your stand mixer, beat 1 cup of room-temperature European salted butter on medium speed until it’s smooth and creamy. Gradually add in ½ cup of granulated sugar and ⅛ teaspoon of salt, mixing until the mixture is light and fluffy. This usually takes about 2-3 minutes. If you prefer, you can learn more about the importance of creaming in baking through King Arthur Baking's blog.
Incorporate the egg yolks, vanilla, and milk
Once your butter and sugar are nicely creamed, it’s time to add in the flavors. Add 2 egg yolks, 2 teaspoons of vanilla extract, and 1 tablespoon of milk to your mixing bowl. Mix on medium speed until everything is well-blended. Make sure to scrape down the sides of the bowl to ensure no pockets of dry ingredients are left.
Mix dry ingredients and combine with wet mixture
Now it’s time for the dry ingredients! In a separate bowl, whisk together 2 cups of all-purpose flour and ½ cup of cake flour. Gradually add this flour mixture to your wet ingredients in two additions, mixing on low speed until no traces of flour remain. If your batter seems a little too thick to pipe, don't hesitate to add another tablespoon of milk.
Pipe your cookies onto the baking sheet
Transfer your cookie dough into a piping bag fitted with a ½-inch open star tip. Pipe your cookies in desired shapes—think circles, pretzels, or rosettes! Make sure to leave at least 2 inches between each cookie on your baking sheet. This spacing is crucial, as it allows the cookies to expand while baking. If you’re feeling festive, consider adding some coarse sugar or sprinkles on top before chilling.
Chill and bake the cookies
Before baking, pop the piped cookies into the refrigerator for about 20-30 minutes. This chilling step enhances the cookie's texture and prevents them from spreading too much in the oven. While they chill, preheat your oven to 350°F. Once chilled, bake the cookies for about 10-15 minutes, or until the edges are just lightly golden. Let them cool on the baking sheet for a few minutes before transferring to a wire rack.
Following these steps will help you create Danish butter cookies that are not only delicious but also a joy to make and share! Enjoy the process and the delightful aroma filling your home.
Variations on Danish Butter Cookies
Chocolate-Dipped Danish Butter Cookies
For a delightful twist, try chocolate-dipping your Danish Butter Cookies! Simply melt some high-quality chocolate in a double boiler, dip half of each cooled cookie into the chocolate, and let them set on parchment paper. This simple variation adds a luxurious touch and a touch of sweetness that pairs beautifully with the buttery flavor of the cookies.
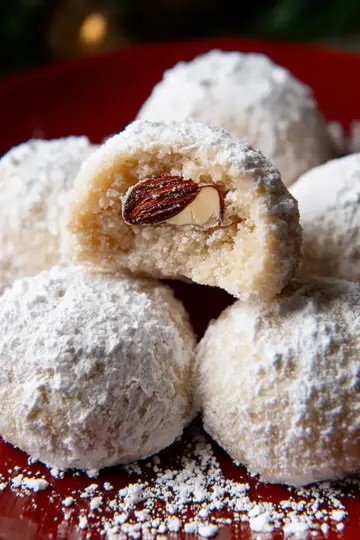
Nutty Danish Butter Cookies with Almonds or Hazelnuts
If you're a nut lover, consider adding chopped almonds or hazelnuts to your Danish Butter Cookies dough. The toasted nuts not only provide a satisfying crunch but also enhance the richness of the cookies. Simply mix in about a half cup of chopped nuts when combining your dry ingredients. This nutty variation offers a wonderful texture and a touch of savory flavor, making these cookies even more irresistible!
Experimenting with these variations is a fantastic way to elevate your baking and impress your family and friends. Enjoy the process and don't hesitate to get creative!
Baking Tips and Notes for Danish Butter Cookies
Importance of butter at room temperature
Using butter at room temperature is crucial for your Danish Butter Cookies. It allows you to cream the butter with sugar more effectively, resulting in a light, airy texture. Aim for butter that's soft enough to leave a finger indentation but cool to the touch, around 67°F (19°C). This simple adjustment sets the foundation for cookies that truly melt in your mouth.
Understanding dough consistency
The consistency of your cookie dough directly impacts the final product. For these cookies, the dough should be thick but pipeable. If it feels too stiff, just add a splash of milk to soften it. Keep it on the thicker side; a well-balanced dough will maintain its shape while baking, leading to beautifully formed Danish Butter Cookies!
Serving Suggestions for Danish Butter Cookies
Creative Ways to Gift or Present Your Cookies
Danish Butter Cookies aren’t just delightful to eat; they also make a fantastic gift! Consider placing them in a charming tin or decorative box lined with parchment paper for that extra touch. You can also create personalized cookie bags wrapped in clear cellophane and tied with a ribbon. For a festive twist, add a handwritten note or a fun holiday tag!
Pairing Suggestions with Beverages
These melt-in-your-mouth cookies complement a variety of drinks beautifully. Try serving them with a warm cup of chai tea or a creamy vanilla latte for a cozy afternoon snack. For something refreshing, an ice-cold glass of milk or a fruity sparkling lemonade can balance their rich, buttery flavor. Whether it's a casual gathering or a special occasion, pairing your Danish Butter Cookies with the right beverage can elevate the experience!
Time Details for Danish Butter Cookies
Preparation Time
Get your kitchen ready in just 15 minutes. This is the time you'll need to gather your ingredients and prepare the cookie dough. Make sure your butter is at room temperature for easy mixing!
Baking Time
Once your cookies are piped and chilled, they’ll bake to golden perfection in 15 minutes. Keep an eye on them, as baking times can vary based on your oven and cookie size.
Total Time
All in all, you’ll spend about 1 hour and 30 minutes on your delightful Danish Butter Cookies, which includes chilling time. This delicious treat is worth every minute spent in the kitchen!
For more on baking techniques, check out resources like the Joy of Baking for helpful tips and tricks.
Nutritional Information for Danish Butter Cookies
Calories and nutritional breakdown
For every Danish butter cookie, you can expect to consume about 374 calories. These cookies are primarily composed of carbohydrates (65g) and fats (7g), making them a sweet indulgence for a special treat.
Key nutrients to note
When enjoying Danish butter cookies, it’s essential to be mindful of their nutritional profile:
- Protein: 11g, which helps balance blood sugar levels.
- Sodium: 178mg, contributing to flavor but should be monitored if reducing salt intake.
- Sugar: 7g, adding that delightful sweetness we all crave!
These cookies can certainly fit into a balanced diet when enjoyed in moderation. For a deeper dive into cookie nutrition and smarter baking, check out resources from the American Heart Association and the USDA FoodData Central.
FAQs about Danish Butter Cookies
What should I do if my dough is too thick?
If your Danish butter cookie dough feels a bit too thick, don’t worry! This can happen, especially if you’ve measured your flour a tad too generously. The simplest solution is to add more moisture. Start by mixing in an extra tablespoon of room temperature milk. This will help soften the dough and make it easier to pipe. Keep in mind to mix gently; over-mixing can develop gluten, making your cookies less tender.
How long do Danish butter cookies last?
Once baked, your delicious Danish butter cookies should last about 5 days when stored in an airtight container at room temperature. For longer storage, consider freezing them! Properly wrapped, they can last up to 3 months without losing their delightful melt-in-your-mouth quality.
Can I freeze the cookie dough?
Absolutely! Freezing the Danish butter cookie dough is a great way to prepare for future baking sessions. Shape your cookies, freeze them on a baking sheet until firm, then transfer them to an airtight container or zip-top bag. When you’re ready to bake, simply pop them into the oven without thawing—just add a couple of extra minutes to the baking time, and you're all set!
Conclusion on Danish Butter Cookies
In closing, Danish butter cookies are a delightful treat that brings warmth and joy, especially during festive seasons. Their simple preparation and melt-in-your-mouth texture make them ideal for sharing or indulging on your own. So go ahead, bake a batch, and create sweet memories!
Danish Butter Cookies (Melt in your mouth
Equipment
- Stand Mixer
- baking sheets
- Parchment paper or silicone mat
- piping bag
Ingredients
- 1 cup European salted butter room temperature
- 100 g granulated sugar
- ⅛ teaspoon salt
- 2 egg yolks
- 2 teaspoons vanilla extract
- 1 tablespoon whole milk or more to soften
- 220 g all-purpose flour
- 50 g cake flour
- coarse sugar for decorating
Instructions
- Make space in the refrigerator and prep the baking mats.
- Cream butter, sugar, and salt.
- Incorporate egg yolks, vanilla, and milk.
- Mix dry ingredients and add into mixture.
- Pipe the cookies.
- Prepare the oven.
- Bake.
Leave a Reply